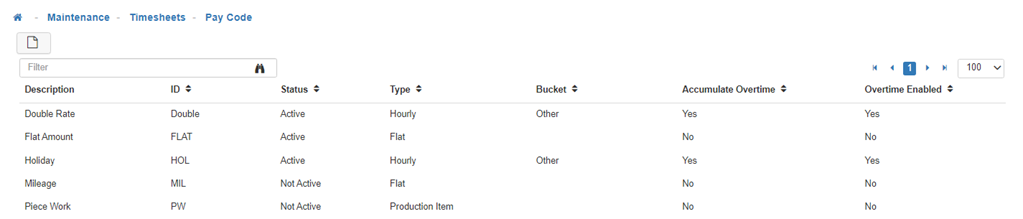
Pay Code
The Pay Code Maintenance allows you to create a list of Pay Codes that will be available for selection on an Employee’s Timesheet.
Navigating through Pay Code Maintenance
-
New
To create a new 'Pay Code', click on the 'New' icon. -
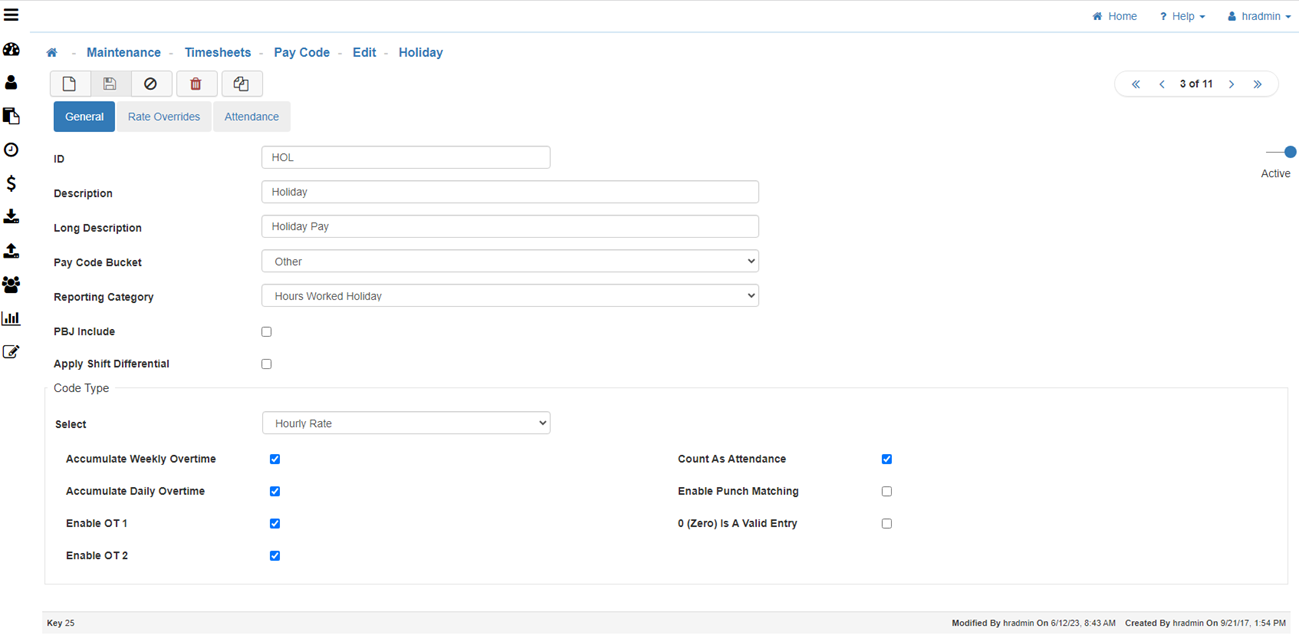
General Tab
-
ID
The ID can be numeric (including special characters), though it is popular to match the ID to the Codes set up in your Payroll system.
Note: This is not mandatory, however, as the Export Interface can cross reference the LightWork Pay Codes to the Pay Codes used in your Payroll system. -
Description
The Description displays in the Pay Code field on the Timesheet Detail screen. -
Long Description
This is just for your reference and only displays in this area. -
Pay Code Bucket
Allows you to select which Bucket the time with this Pay Code will be grouped under on the Timesheet List screen.
Note: This is for filtering purposes on the Timesheet List screen and does not affect anything else in the system. -
Reporting Category
Select the appropriate Reporting Category for reporting purposes. -
PBJ Include
-
Apply Shift Differential
-
Active/Deactivated
When set to 'Active', this toggle (located on the top, right-hand side of the screen) will make the Pay Code available for selection when recording time on a Timesheet.
Note: In a scenario where you would like a Pay Code to be used for Time Off Requests, but not allowed to be available for selection from a Timesheet, you can set the code to 'Deactivated' but add it under the 'Configure Pay Codes' section of the Time Off Request Configuration Maintenance. -
Code Type
Select one of the following:-
Hourly Rate
-
Accumulate Weekly Overtime
If selected this will allow Weekly Overtime. (I.e. Anything over XX hours a week will be considered Overtime and the Weekly Overtime Threshold is set up in the Pay Policy Maintenance.) -
Accumulate Daily Overtime
If selected this will allow Daily Overtime. (I.e. Anything over XX hours a day will be considered Overtime and the Daily Overtime Threshold is set up in the Pay Policy Maintenance.) -
Enable OT 1
If selected this Code will enable Overtime. -
Enable OT 2
If selected this Code will enable Double Overtime. -
Count As Attendance
If selected this Pay Code will represent that the Employee is present and will allow you to track an Employee's available Time Off, etc. -
Enable Punch Matching
If selected this Pay Code will automatically be assigned to Employee's who Punch In.
Note: This can only be assigned to one Pay Code. -
0 (Zero) Is A Valid Entry
If selected it will allow LightWork Users to enter time with a value of zero.
-
-
Flat Amount
-
Default Amount
-
Allow Flat Amount Override
-
-
Production Item
-
-
Rate Overrides Tab
This Tab allows you to override an Employee's Pay Rate (Unit Rate) based on the Type selected.
-
Mode
Select one of the following:-
None
-
All
Will apply the Rate Override to Regular, OT1, and OT2. -
Individual
Allows you to separate the Rate Override for Regular, OT1, and OT2.
-
-
Type & Value
If you choose 'All' or 'Individual' for the Mode you will need to assign a Type & Value.-
None
-
Rate
Assigns the new Pay Rate (Unit Rate) put in the Value field. -
Rate + X
Will take the normal Pay Rate and add the number in the Value field. -
Rate * X
Will take the normal Pay Rate and multiply the number in the Value field. -
Base Plus X then times Y
Will take the normal Pay Rate and add the number in the 'X' Value field and then multiply that total by the number in the 'Y' Value field.
-
-
Attendance Tab
This tab allows you to link the Pay Code to an Attendance Plan. During the entry of time, if an Employee is enrolled in one of the listed plans, the system will check and validate the hours being taken and notify the User if this will exceed the available hours.
Note: This message is currently informational, and will not stop the User from entering the time.
-
Add Plan
To link an Attendance Plan to this Pay Code click on 'Add Plan'. -
Remove Plan(s)
To remove any linked Attendance Plan(s) from the list, select the desired Plan and click on 'Remove Plan(s)'. -
Save
Once you are satisfied with your selections, click on 'Save'.